Understanding the Git Workflow
Understand the complete Git workflow and learn how changes move from your files into permanent project history.
Introduction
One of the biggest sources of confusion for new Git users is understanding what happens after a file changes. You edit a file, run a few Git commands, and somehow Git creates project history. Understanding the Git workflow makes everything else in Git easier to understand.
In this guide, you will learn how changes move through Git, why the staging area exists, and how Git transforms file changes into permanent project history.
Why The Git Workflow Matters
Git does not immediately save every file change into project history. Instead, changes move through a workflow that gives you complete control over what becomes part of a commit.
This workflow allows developers to review changes, group related work together, and create meaningful project history instead of recording every small modification.
Real World Example
Imagine you are building a website and spend two hours making changes to ten files. Some changes fix bugs, while others add a new feature. Git allows you to decide exactly which changes belong together before creating a commit.
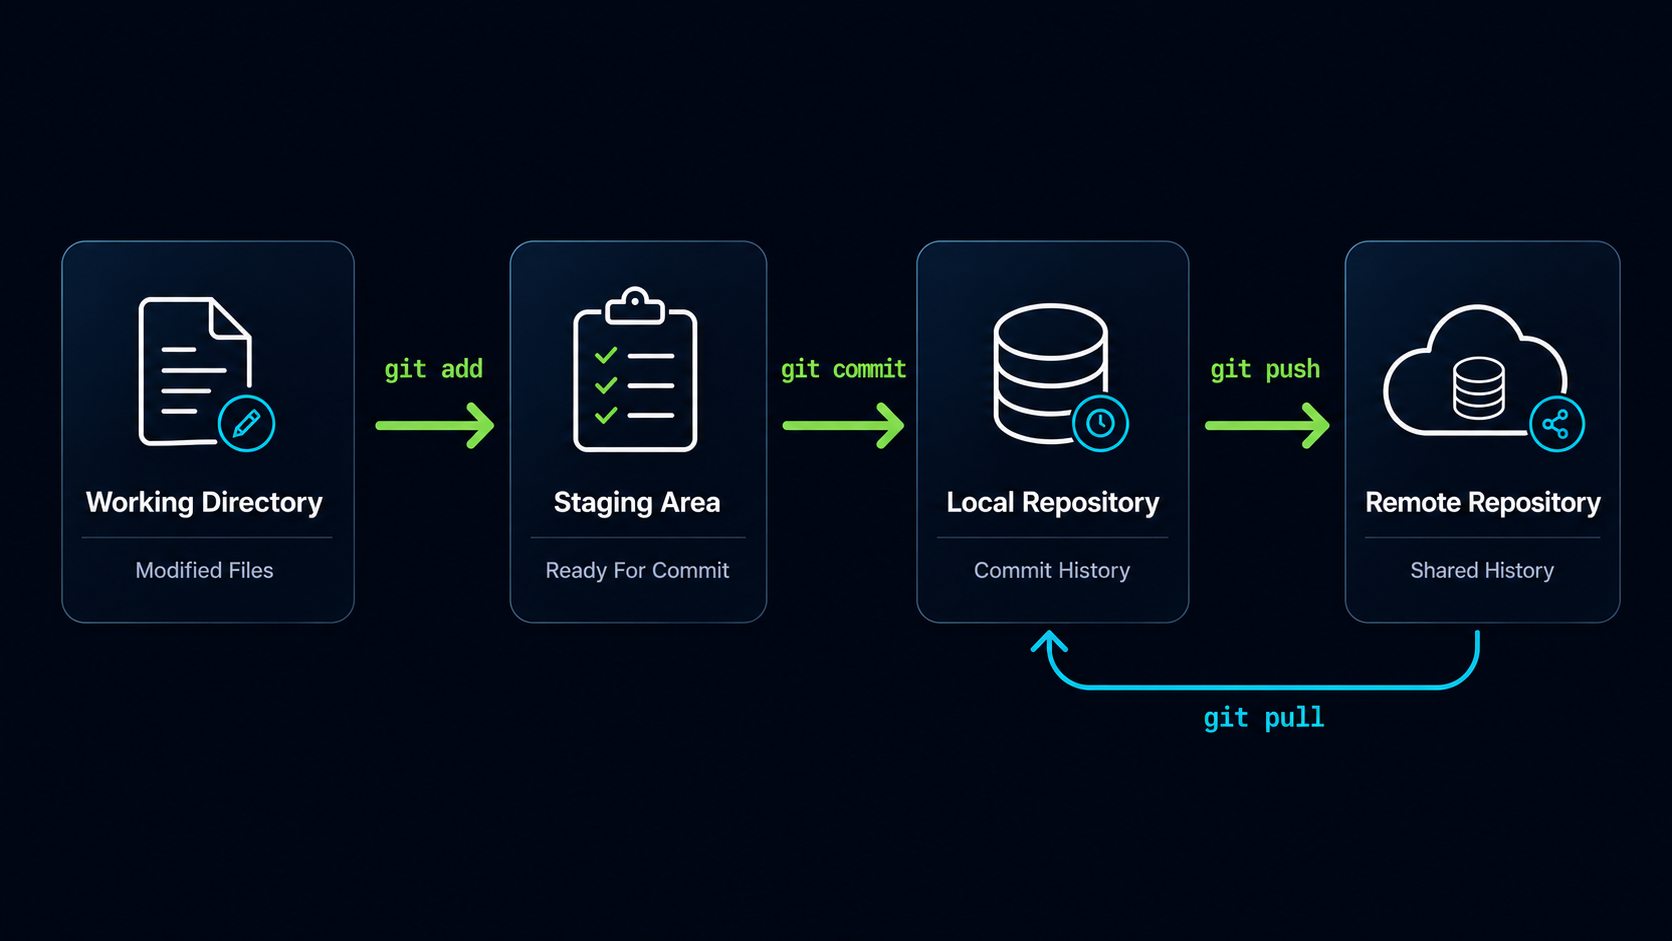
The Git Workflow Mental Model
Think of Git as a three-stage system. Changes begin in your files, move into a preparation area, and then become permanent history.
| Stage | Purpose |
|---|---|
| Working Directory | Where you edit files |
| Staging Area | Where you choose changes for the next commit |
| Local Repository | Where commits are permanently stored |
| Remote Repository | Shared copy stored on GitHub or another server |
Most Git commands exist to move changes between these stages.
Understanding The Working Directory
The Working Directory is the project folder you work in every day. Whenever you create, edit, rename, or delete files, those changes happen inside the Working Directory.
At this stage, Git sees that changes exist but those changes are not yet part of project history.
| Action | Location |
|---|---|
| Create a file | Working Directory |
| Edit a file | Working Directory |
| Delete a file | Working Directory |
| Rename a file | Working Directory |
Think of the Working Directory as your active workspace where development happens.
Understanding The Staging Area
The Staging Area is one of Git's most powerful features. It acts as a preparation area where you select the changes that should become part of the next commit.
Instead of committing every change immediately, Git allows you to review and organize changes first.
Packing A Suitcase
Imagine preparing for a trip. Your room contains many items, but only the items placed into your suitcase are ready to travel. The Working Directory is your room. The Staging Area is the suitcase.
Changes enter the Staging Area using the git add command.
Understanding The Local Repository
Once changes are staged, you can create a commit. A commit permanently records those changes inside the repository's history.
Every commit becomes a checkpoint that you can revisit later.
| Before Commit | After Commit |
|---|---|
| Changes exist but are not saved | Changes become part of project history |
| Work can still be staged | History now contains a checkpoint |
| Temporary state | Permanent record |
Commits are stored inside the Local Repository on your computer.
Understanding The Remote Repository
The Remote Repository is a copy of your repository stored on another system such as GitHub.
Teams use remote repositories to share code, collaborate, and back up project history.
Changes move from the Local Repository to a Remote Repository using the git push command and move back using git pull.
Following A Change Through The Workflow
Let's follow a single file change through the complete Git workflow.
| Step | Action |
|---|---|
| 1 | Edit a file in the Working Directory |
| 2 | Add the file to the Staging Area using git add |
| 3 | Create a commit using git commit |
| 4 | Push the commit to GitHub using git push |
Every change you make will follow this same basic journey through Git.
Seeing The Workflow In Action
The git status command is the easiest way to see where changes currently exist within the workflow.
Check The Current Repository Status
Open Git Bash inside a repository and run git status.
Git will show which files are modified, staged, or committed.
git status[user@computer MINGW64 ~/my-first-project (main)]
$ git status
On branch main
Changes not staged for commit:
modified: README.md
This output tells us the file exists in the Working Directory but has not yet entered the Staging Area.
Stage The File
Add the file to the Staging Area.
The file is now prepared for the next commit.
git add README.md[user@computer MINGW64 ~/my-first-project (main)]
$ git add README.md
Verify The Staged Change
Run git status again.
The file should now appear in the staging area.
git status[user@computer MINGW64 ~/my-first-project (main)]
$ git status
Changes to be committed:
modified: README.md
The file has now moved from the Working Directory into the Staging Area and is ready for a commit.
Common Beginner Mistakes
| Mistake | Result | Solution |
|---|---|---|
| Skipping git add | Changes never reach a commit | Stage changes before committing |
| Thinking git commit saves all files automatically | Unexpected files are omitted | Review staged files first |
| Confusing Working Directory and Repository | Workflow becomes difficult to understand | Learn the three stages separately |
| Ignoring git status | Uncertainty about current state | Check status frequently |
Learn Git Status Early
Many experienced developers run git status constantly because it provides a real-time view of where changes exist within the Git workflow.
Why This Step Matters
Understanding the Git workflow is the foundation for everything else in Git. Branches, merges, GitHub, pull requests, and collaboration all build upon the concepts introduced in this guide.
Once you understand where changes live and how they move through Git, the rest of the Git ecosystem becomes much easier to learn.
Conclusion
In this guide, you learned how changes move through Git from the Working Directory to the Staging Area, into the Local Repository, and eventually to a Remote Repository. Understanding this workflow helps transform Git from a collection of commands into a clear and predictable system.