Creating Your First GitHub Repository
Learn how to create a GitHub repository and prepare an online home for your Git project.
Introduction
Now that you understand what GitHub is and how it works alongside Git, it's time to create your first GitHub repository.
A GitHub repository provides an online home for your project. It stores your code, commit history, branches, and project information on GitHub's servers.
In this guide, you'll create a repository on GitHub and learn what the most important repository settings mean.
Why GitHub Repositories Matter
Git can manage a project entirely on your local computer, but a GitHub repository gives your project an online destination where it can be backed up, shared, and accessed from multiple devices.
Real World Example
Imagine spending several weeks building a website on your laptop. By creating a GitHub repository, you gain an online copy of the project that can be accessed even if your laptop is unavailable.
GitHub Repository Mental Model
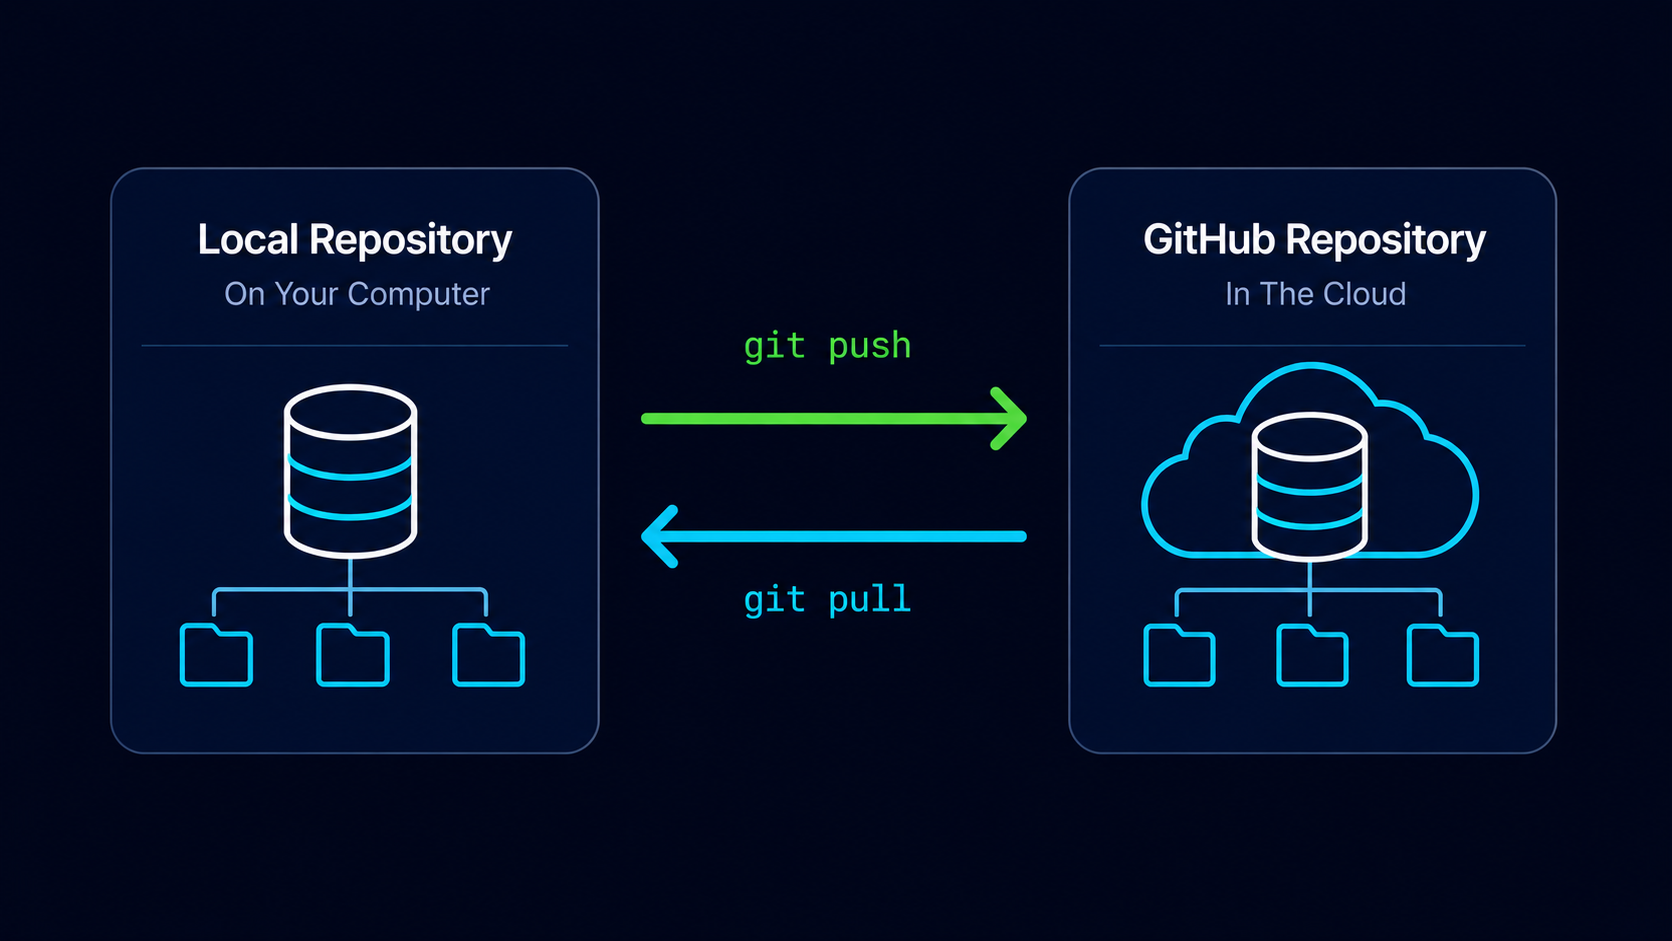
Think of a GitHub repository as an online vault for your project's history. Your local repository remains on your computer, while GitHub stores a synchronized copy in the cloud.
Simple Mental Model
Your local repository lives on your computer. Your GitHub repository lives on GitHub's servers.
Sign In To GitHub
Before creating a repository, sign in to your GitHub account.
Open GitHub
Open GitHub in your web browser.
Use the GitHub account you created earlier.
Sign In To Your Account
Log in using your GitHub username and password.
After signing in, you should see your GitHub dashboard.
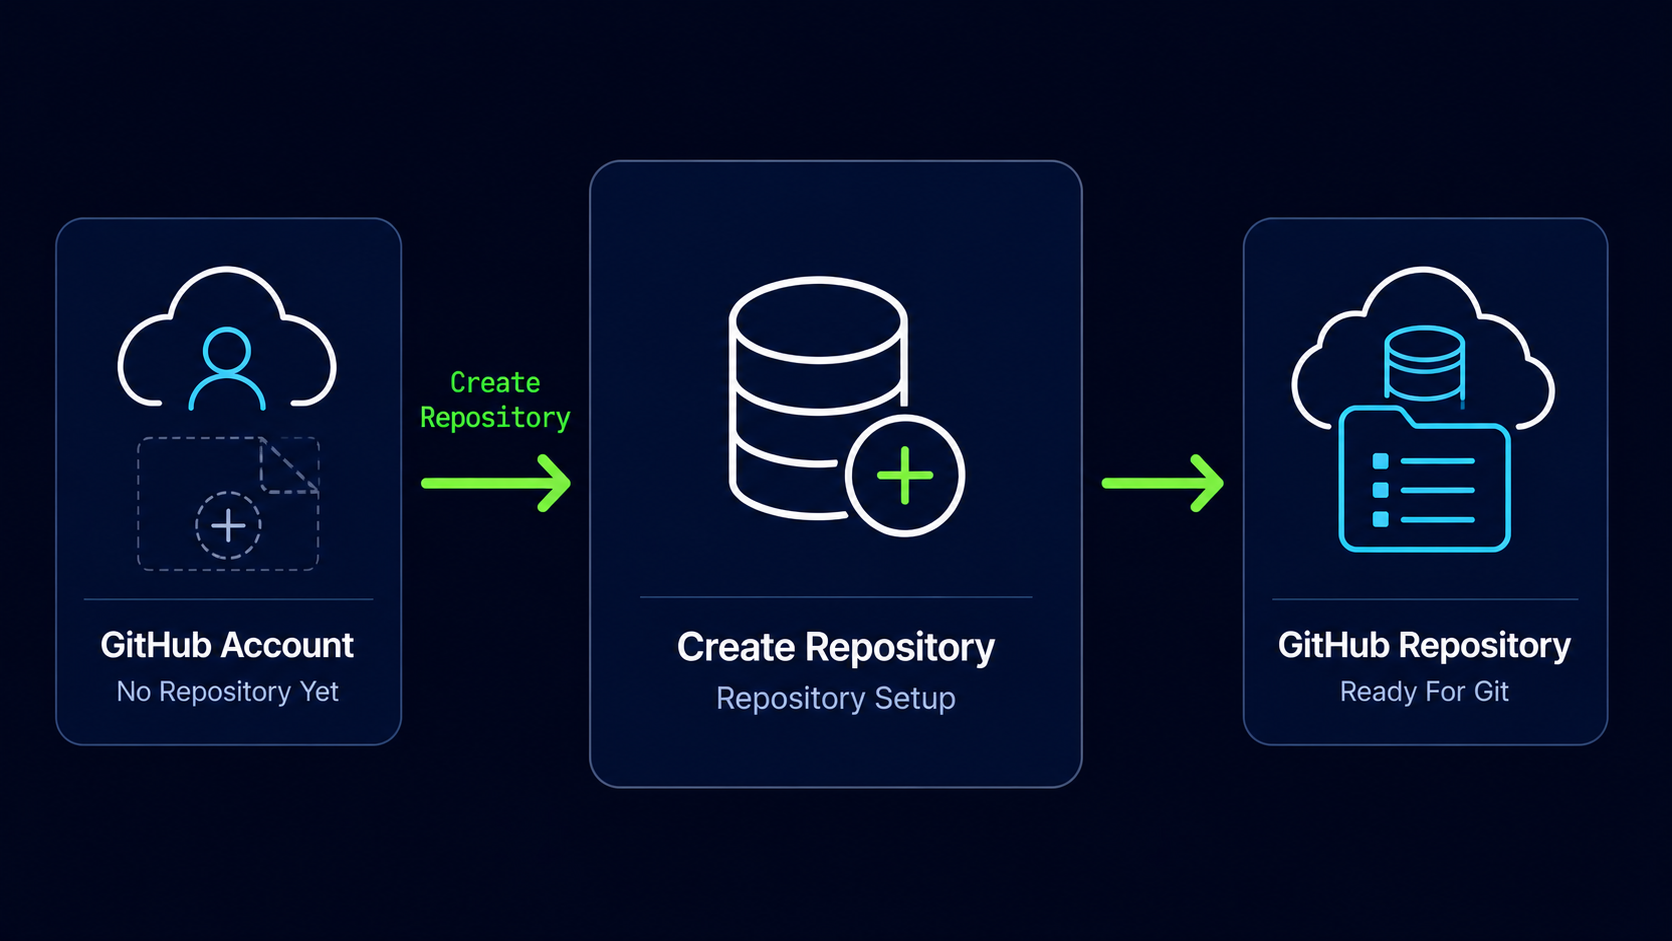
Create A New Repository
GitHub makes it easy to create new repositories from anywhere within the platform.
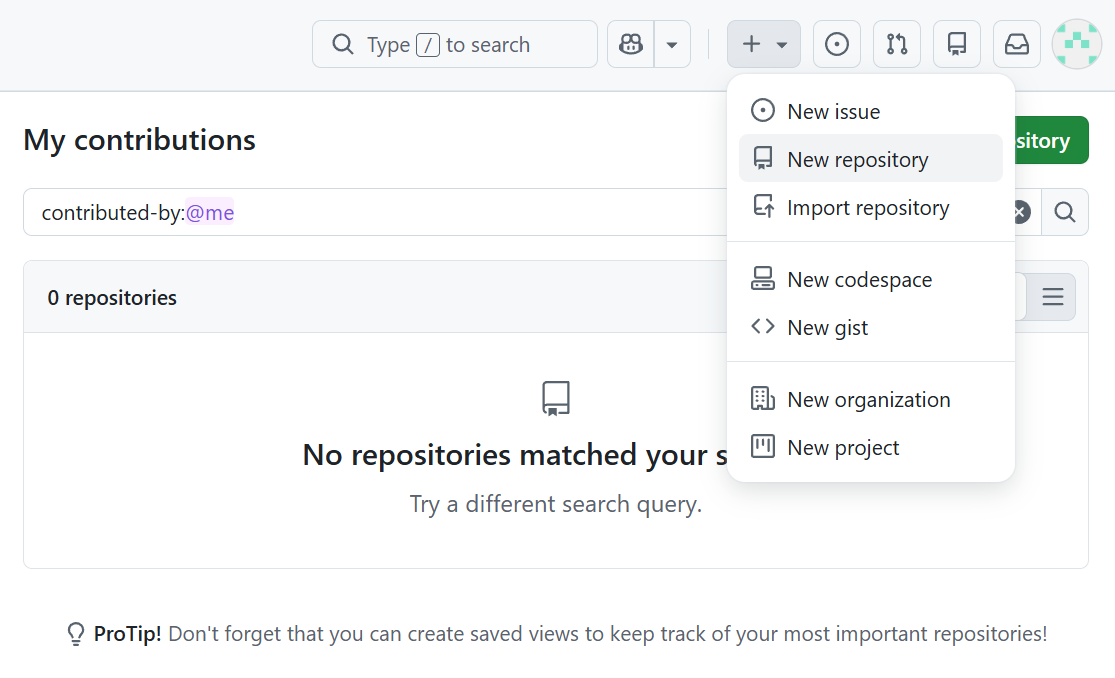
Open The New Repository Page
Click the plus icon in the upper-right corner of GitHub and select New repository.
You can also click the New button from your repositories page.
Configure The Repository
GitHub will ask for a few pieces of information before creating the repository.
Enter A Repository Name
Choose a descriptive name for the repository.
Repository names should clearly identify the project.
Example Repository Names
my-first-project, personal-website, php-learning-project, portfolio-site
Add A Description (Optional)
Enter a short description explaining what the project is about.
Descriptions make repositories easier to understand later.
Choose Repository Visibility
Select either Public or Private visibility.
This determines who can view the repository.
| Visibility | Meaning |
|---|---|
| Public | Anyone can view the repository |
| Private | Only approved users can access the repository |
Many beginners choose Public repositories when learning because they make it easy to share projects and build a GitHub profile.
Understanding Repository Options
GitHub provides several optional settings during repository creation.
| Option | Purpose |
|---|---|
| Add a README file | Creates a starting project description |
| Add .gitignore | Excludes specific files from Git tracking |
| Choose a license | Defines how others may use the project |
Since you already have a local Git repository from earlier guides, leave these options unchecked for now.
Create The Repository
Click the Create repository button.
GitHub will create the repository and display its main page.
Explore The New Repository
Because the repository is currently empty, GitHub displays setup instructions to help you connect an existing repository or create a new one.
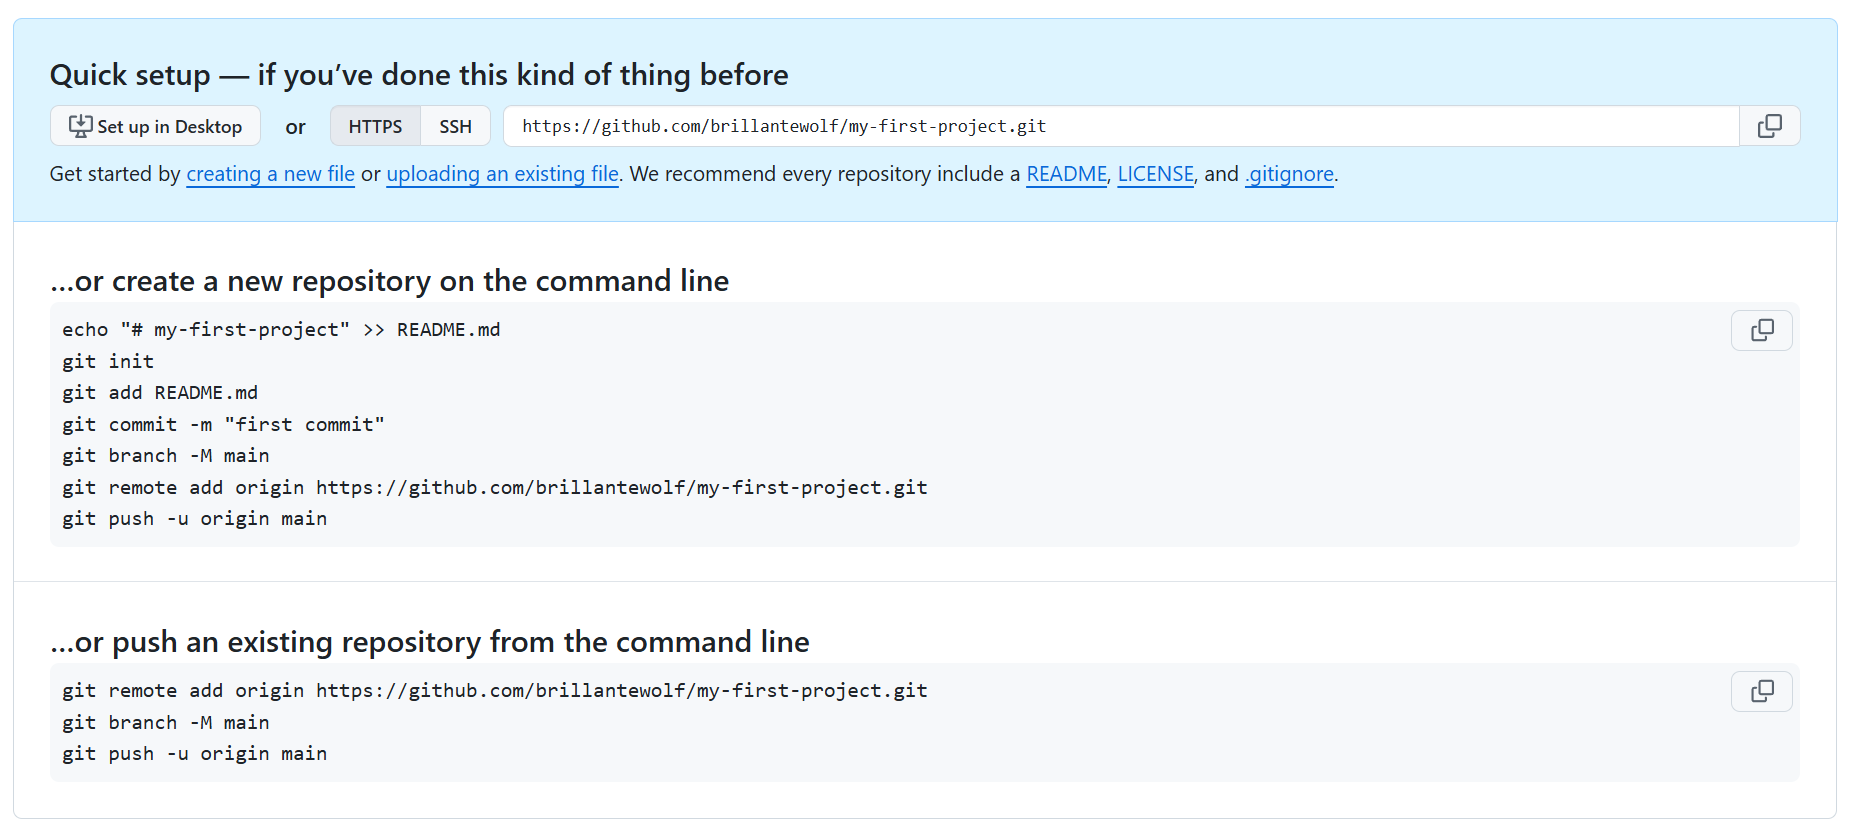
These instructions will become useful in the next guide when you connect your local repository to GitHub.
Understanding The Repository URL
Every GitHub repository has a unique URL that identifies it on GitHub.
Example Repository URL
https://github.com/username/my-first-project
Git uses this URL later when connecting your local repository to GitHub.
Common Beginner Mistakes
| Mistake | Why It Happens | Better Habit |
|---|---|---|
| Choosing a vague repository name | Lack of planning | Use descriptive project names |
| Selecting the wrong visibility option | Not understanding public vs private | Review visibility carefully |
| Adding a README unnecessarily | Following generic tutorials | Leave initialization options unchecked |
| Confusing local and GitHub repositories | Similar terminology | Remember local is on your computer and GitHub is online |
Why This Step Matters
Creating a GitHub repository establishes the online destination for your project. Without it, there is nowhere to push your commits and branches.
This repository becomes the foundation for backup, synchronization, collaboration, and future GitHub workflows.
Looking Ahead
Now that your GitHub repository exists, the next step is connecting it to your local Git repository. Once connected, Git can synchronize commits between your computer and GitHub.
Conclusion
In this guide, you learned how to create a GitHub repository, configure repository settings, choose visibility options, and prepare the repository for connecting to a local Git project.